
iPhone Email Settings (for iOS 15 and later)
Follow these steps to set up company e-mail on your iPhone (valid for ASO servers).
From the home screen: Settings > Mail > Accounts > Add Account > Other > Add Mail Account
- Name: your name (e.g. John Wick)
- Email: your e-mail address ([email protected])
- Server:
smaug.aso.com.tr (SSL on)
or mail.yourcompany.com (may ask about a security certificate; SSL must be off) - Description: your company name
Next >
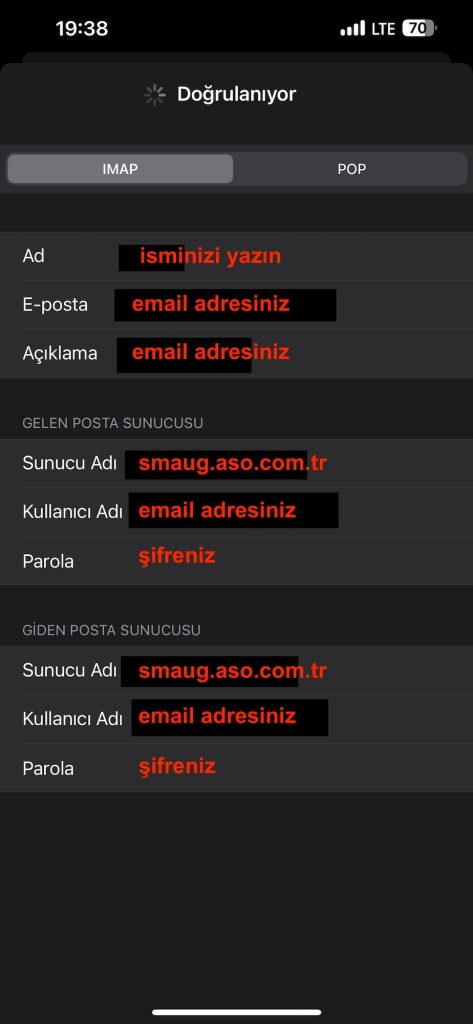
The screen below will appear. Fill it in with the details you were given, as shown, and save. Then tap the Mail app on the home screen.
Company E-mail Prices
Frequently asked questions
How do I set up a company e-mail account on iPhone?
Go to Settings > Mail > Accounts > Add Account > Other > Add Mail Account, then enter your server and other details.
Should SSL be on in iPhone e-mail settings?
With the smaug.aso.com.tr server, SSL must be on. With servers such as mail.yourcompany.com a certificate warning may appear and SSL must be off.
What is the Description field for?
It identifies the account; enter your company name or the purpose of the account.
What information do I need to add an e-mail account?
Your name, e-mail address, server and a description; then save the account.
What should I do if I have problems?
Check your internet connection first, then delete the account under Settings > Mail > Accounts and set it up again. If the problem persists, contact our technical support.


Comments (0)